Rapid Prototyping & Rapid Manufacturing Expert
Specialize in CNC machining, 3D printing, urethane casting, rapid tooling, injection molding, metal casting, sheet metal and extrusion
Knowledge of tolerance for CNC machining
Tolerance is an acceptable range of deviations from expected values for dimensions determined by the designer based on the shape, fit and function of the part. CNC machining is very precise, but not perfect, it is impossible for two parts made using the same manufacturing process to make the same part with the same exact dimensions even on the same CNC machine. Unless otherwise specified by the designer, standard tolerances generally used for CNC machining are +/- .005″ for metal parts and +/- .010″ for plastic parts. If tighter tolerances for CNC machining are required (eg +/- .002”), the more precise information of the critical dimensions must be marked on the drawings.
The Types of Tolerance For CNC Machining
Tolerance terms related to CNC machining: CNC machine tolerances and CNC machining design tolerances. CNC machine tolerance is the dimensional accuracy that a machine tool can achieve when machining parts. CNC machine with highly precise, and some machine is capable to machining parts with accuracy of ± 0.0025mm, about a quarter the size of a human hair. However, tolerances vary between CNC machines and are usually set by the manufacturer.

Design tolerance for CNC machining refers to the acceptable range of dimensional variation of the part during design and machining. Determined by the designer according to the function, fit and shape of the part, within the range of dimensional changes, the full function of the part can still be achieved. Parts designed for tolerances are important to fit with other components, such as mobile phone cases, which require higher tolerances than air conditioning cases. The tolerance is generally written next to the dimensional number to which it applies, and is marked by “±” (bilateral tolerance).

Types of CNC machining design tolerance included limit tolerances, unilateral tolerances, bilateral tolerances, and a tolerance system called geometric Dimensions and tolerances (GD&T).
Limit CNC machining tolerances. Limit tolerances are the upper and lower limits of the acceptable range of specified dimensions. The upper limit refers to the largest acceptable size, while the lower limit refers to the smallest acceptable size. Any value in between is acceptable. For example, limit tolerance 0.55 – 0.65 mm, 0.55 mm is the upper limit and 0.65 is the lower limit.

Unilateral tolerances. Unilateral tolerance refers to the acceptable range that allows the dimensional variation of a part in one direction. The direction can be positive or negative (increase or decrease from the specified value). For example, unilateral tolerance is 1.5 mm +.000/-.005, this means that dimensions may deviate by up to 1.505mm, but not less than 1.5mm from the original specified value.

Bilateral tolerances. The bilateral tolerances for CNC machining means the upper and lower deviation range compared to the standard size. In contrast to the unilateral tolerance, the deviation of bilateral tolerance occurs in both positive and negative directions.

Geometric Dimensions and tolerances (GD&T). GD&T is a more advanced and difficult system than Standard Dimensioning and Tolerances(SD&T), which provides not only the dimensions and tolerances of parts, but also the specified geometric features. GD&T further covers geometric features such as flatness, true position and concentricity.

Considerations for selecting tolerance
One of the keys to setting reasonable tolerance for CNC machining is figuring out when the function and performance of a part will be affected by size or dimensional changes. For certain types of parts, such as critical components in ventilators, tight tolerances are required, and any misstep in geometry can have serious consequences. Other types of parts may not require high precision, and there is no harm in slightly larger machining deviation. Here are a few points should be considered when choosing tolerances:
When tight tolerances are required. Tolerances are usually set at structural points where difference parts need to be tightly connected (such as holes) or connected to other components. If a part needs to fit with one or more components, it must have tight tolerances. You should include tolerance information in the drawing so that the CNC machining supplier can better understand how the part will work. It’s should be noted that even if the same tool produces multiple copies of the same part, the accuracy may become less consistent due to wear and tear on the CNC machine. If you order 1,500 parts with ±0.001” tolerance, your CNC machining supplier may need to change machining tooling or adjust machining speed in pursuit of consistent tolerances.

The cost of tight tolerances. It’s should be noted, when CNC machines are slowed down for maintain tighter tolerance, longer machining times are required, resulting the cost increased. Increasing the tolerance by just one decimal point would increase the cost by 2-3 times. Extending the tolerance by one decimal point and the associated geometry, the cost will be more than twice as much as maintaining at standard tolerance.

Tolerance depends on material. When designing tolerance for CNC machining, you must consider the material you choose. Different materials have different properties that affect the achievable tolerance levels. Softer materials tend to change size during CNC machining. Hard materials will cause the tool to wear out faster, requiring multiple changing of the tool. In particular, plastic materials have poor thermal stability and are easy to deform when contacting with the tools. Plastic materials like nylon may not be able to maintain the same tight tolerances as aluminum.

Choice of manufacturing method. Each CNC machine has different tolerances, and some can achieve their coveted tolerances. In some cases, you may have to perform additional operations on the part to achieve the fine tolerances you require. Such as additional fixtures, special measuring tools. For example, in order to achieve a tighter tolerance of the holes, holes machined by vertical milling machine still need to be drilled on a lathe machine. And tighter tolerance requirements may require grinding or lapping.

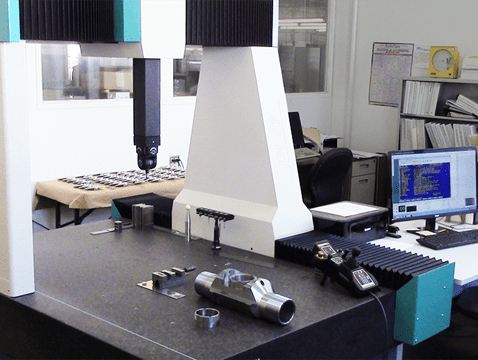
Inspection. You will need a lot of time to inspect parts with very tight tolerances. You may also need to use specialized tools and equipment to verify part tolerances. Such as CMM (coordinate measuring machine) and other precision measurement equipments.

How to achieve proper tolerance for CNC machining
For product or part designers, send 3D CAD models and 2D drawings of GD&T tolerances to your CNC machining supplier and clearly mark the tolerances for critical dimension, so that they fully understand the function of the part. This is very important for how to achieve the right tolerances because of the time and cost involved in machining.
Consider the purpose of the part. Not all parts need to be designed to with tight tolerances. For example, manufacturing the part that no need to fit with other partsoften requires lower CNC milling accuracy. Considering the cost will be super high to achieve the tighter tolerance, and if you do not need such tighter tolerance, you can consider to relax the tolerance requirements, then the cost will be not such higher.

Keep in mind the properties of the material. For soft or very hard materials, try to maintain loose tolerances.
Find a trusted CNC machining supplier. One way to achieve tolerances is to find a trusted CNC machining supplier. CNC machining suppliers achieve optimal tolerances through additional wire cutting, EDM, grinding, boring, grinding and other additional processes. CNC processing services also include quality inspection, material certification and full-size inspection reports. Relying on cutting-edge metrology and measurement tools are essential to ensure that prototypes or final parts meet accurate specifications and tolerances.
Conclusion
Now you know the main considerations in choosing tolerances for your next CNC machining project. Simply follow these rules and do enough consideration before designing the tolerance and you’ll have a design that is easy to manufacture and cost effective. No matter how complex your design, DDPROTOTYPE is the manufacturing partner to meet your needs, with standard tolerances to DIN-2768-1-fine for CNC machined metals and DIN-2768-1-Medium for plastics. Our factory located in Shenzhen China, we have number of 3, 4 and 5 axis CNC machines and offers different surface treatment processes such as polishing, anodizing, electroplating, electrophoresis, sandblasting, and of course, full-size inspection reports for the part.


